In Unit 1 of Learn ESP32 with Arduino IDE everything appeared to be going fine but when uploading the WIFI Scan skech I get the Fail to connect to the ESP32 error. I am using a Win 7 laptop, ESP32 DEVKITV1 development board on COM4. At the bottom of the IDE GUI one of the comments is “None on COM4”. In the tools port pull down COM4 and COM3 are listed. In the device manager the Silicon Labs USB to UART Bridge is on COM4. What am I doing wrong?
try to make sure that in device monitor the properties are set to 115200 8,N,1 .hope this helps
Learn how to fix this issue permanently and read: [SOLVED] Failed to connect to ESP32: Timed out waiting for packet header
Can you do this exact procedure with the Arduino IDE serial monitor open?
Having the right board name and COM por selected, do the following:
- Open the Arduino IDE Serial Monitor
- Hold-down the “BOOT” button
- Press the “ENABLE” button once
- Release the finger from the “BOOT” button
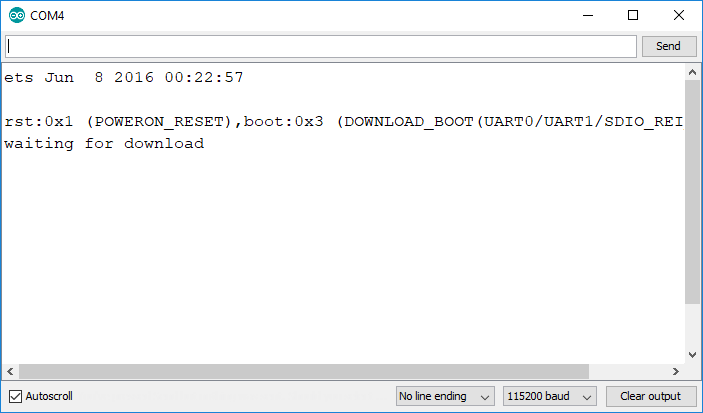
Do you see the following message in your Arduino IDE Serial Monitor?
“rst:0x1 (POWERON_RESET),boot:0x3 (DOWNLOAD_BOOT(UART0/UART1/SDIO_REI_REO_V2))
waiting for download”
- After seeing that message, press the “Upload” button in your Arduino IDE to upload a new sketch
To be honest I’m not sure why that happens, because I don’t have any board with that behavior… But I think it’s either something wrong your specific ESP board or the Arduino IDE fails to send the right command sequence to put the ESP32 board in flashing/uploading mode.
In those boards/with that setup, after uploading a new sketch, press the “Enable” button to restart the ESP32 and run the new sketch uploaded.
————-
Learn how to fix the Fatal Error Occurred: “Failed to connect to ESP32: Timed out waiting for packet header” error when trying to upload new code to your ESP32 board once for all.
I got the “waiting for download” in the serial monitor. But I still got the fatal error. “Failed to connect to ESP32” The board is not a DOIT but it is labeled ESP32 DEVKITV1 on the bottom. I also have a NODEMCU ESP-325. I used the NODEMCU-32S board in the Arduino IDE and got the same result. I set the baud rate to 115200 in both tools and serial monitor. In the NodeMCU-32S the line on the bottom of the IDE says 115200 on COM4. The ESD32 DEVKITV1 bottom line says 115200, None on COM4. Carl
When you remove the ESP32 board from your computer, is COM 4 still available?
You need see which COM port becomes available when you plug the ESP32 board to your computer and select that COM port.
Can you try with the more generic “ESP32 Dev Module” option from the Boards name option? Please follow the exact same procedure where you see the message appearing in your serial monitor saying “waiting for download”.
COM4 only comes available when I plug in the esp32 board. I get the same result with the “ESP32 Dev Module. However, I did all the modules of the SPARCFUN “Arduino Inventors Kit” with a different Win 10 laptop. I retested the Win 10 laptop on a sparkfun board and it worked fine. I then downloaded the esp32 code. Both the boards work fine with the Win 10 laptop. The only difference I can see is the problem laptop has Win 7 32 OS the good laptop has Win 10 64 OS. I installed the 32 bit USB driver on the Win 7 laptop. The COM5 is used on the Win 10 laptop and COM4 is used on the Win 7 laptop. Carl
I have the same problem when I use USB 3.0.
A fatal error occurred: Failed to connect to ESP32: Timed out waiting for packet header
But when I connect to USB 2.0 everything works fine..Strange behauvior (bug ?)
Tested on different PC’s with same results.
WIN10 with arduino 1.8.5
@Carl to be honest I’m not sure, if you see the “waiting for download” message and then you press the Upload button in your Arduino IDE (with the right COM port and board selected), it should upload the code to your board.
I’ve tested with Windows 7 and I was able to run the ESP32 code in Arduino IDE. But according to the official documentation they only guarantee full support for Windows 10: https://github.com/espressif/arduino-esp32/blob/master/docs/arduino-ide/windows.md
Hi @Jos that’s definitely an unexpected behavior, but I’ve also experienced same problems when using a bad USB (I had very often failed uploads until I used a new USB cable).
My experience with Windows 10 and ESP Wroom 32, Node MCU 32S
> On the end of uploading I got following failure:
>> “Failed to connect to ESP32: Timed out waiting for packet
>> header”.
My first solution:
connect GPIO0 with GND
upload
dis-connect GPIO0 from GND
press EN
My latest solution:
connect GPIO2 with 10k resistor to GND and keep it
upload
No problem anymore!
@Friedhelm Stroinski you can also hold down the BOOT button while it says “connecting….” and it will force your ESP to go into flashing mode to receive the new sketch.