Last year I completed a project using MicroPython to program an ESP32 with four temperature inputs and one digital output similar to your “MQTT-Connect ESP32/ESP8266 to Node-Red”. I installed Mosquitto MQTT Broker on my Rasberry PI. And it is still working after a year but only locally on wifi. I tried using ngrok to get out on the web to access my temperatures from anywhere but was never successful. And then you recently came out with “Access Node-RED Dashboard from Anywhere using Digital Ocean” project using Digital Ocean and it seemed perfect from my project but it used the Arduino IDE instead of the MicroPython IDE that I used.
My question is could I use Digital Ocean on my project instead of ngrok and use the Linux Ubuntu VM instead of the Raspberry PI to access my information from anywhere? And would the coding be very similar?
I hope you can understand my question and information.
Gayland
Hi.
You can install Node-RED and Mosquitto on Digital Ocean to access your sensor readings from anywhere. The installation procedure is the same as we describe in our tutorials.
It doesn’t matter if your ESP32 is programmed using Arduino IDE or MicroPython.
In your MicroPython script, you just need to connect to the cloud MQTT broker and program the ESP32 to publish or subscribe to topics using MQTT. We have tutorials about MicroPython with MQTT in our MicroPython course and also some tutorials on the RNT website.
I hope this helps.
Regards,
Sara
Thank you so much. I’ll try connecting to the Digital Ocean as recommended.
Gayland
Sara,
I still haven’t been able to connect with my sensors or switch output and I think it’s because of not authenticating the MQTT Broker with my username and password. I believe it should be put in the boot.py script but am not exactly sure where or what form. The boot.py would like to one used in your MicroPython Es32/ES8266 course, module 5, MQTT-Connect ESP32/ESP8266 to Node-RED, page 258-259, except adding the MQTT Broker username and password.
Now the question is where is the MQTT Broker username and password entered into the boot.py script and what is the form?
Thank you for your patience.
Gayland
Hi again.
In your code, you should have a function called
def connect_and_subscribe():
inside that function there should be a line like this:
client = MQTTClient(client_id, mqtt_server)
Instead of this last line, use the following:
client = MQTTClient(client_id, mqtt_server, user=your_username, password=your_password)
Insert your username and password and it should work.
Regards,
Sara
Sara,
I’ve tried your suggestion of inserting my user name and pw but I still can’t get my reading to come over to the node-red palette. The node-red palette items, temperatures and output, just read “connecting” with the little yellow square. Again, I’m using the coding from the MicroPython course book unit “MQTT-Connect ESP32/ESP8266 to Node-Red” and did have success at reading this locally using a Raspberry Pi as the MQTT Broker, but trying to put this on DigitalOcean has been a challenge. Putting this on DigitalOcean and getting temperatures and output information for anywhere would be a break through for me.
Do you have have other suggestions on trouble shooting my problem? This seems like it would be a nice future project as a continuation under your MicroPython course book.
I guess I should also ask the question, is MicroPython robust enough to run from the cloud (DigitalOcean)?
Thank you in advance and I still enjoy your lessons. You have the best of this type. I’m just hopping I can keep the pace as you advance in your lessons and methods.
Gayland
Hi again.
Can you show me a printscreen of what you see in Node-RED?
To share an image you can paste a link to imgur, google drive or dropbox.
Regards,
Sara
Hi again.
I’ve received your image via email.
There must be something not configured properly.
In this tutorial: https://randomnerdtutorials.com/cloud-mqtt-mosquitto-broker-access-anywhere-digital-ocean/
Were you successful testing the installation? I’m talking about the section called: “Testing MQTT Mosquitto Broker Installation”?
Can you follow that part and see what you get?
Regards,
Sara
Sara,
Thank you for the great suggestions. I will try them and get back to you.
Gayland
Sara,
I did the test that you suggested and I got “hello world” on the second Putty terminal. And then I went back to the Node-Red worksheet palette and it still has the little yellow boxes indicating “connecting”.
Any suggestions as to where I can go from here to begin to see temperature and out information?
Gayland
Can you show me the lines of code that you use to insert the MQTT broker and connect to it? (hide the username and password)
Additionally, can you double-check your username and password? Many times, connection issues are related with small typos on the username and password.
Regards,
Sara
Sara,
Thanks again for getting back to me in a timely matter.
Below is the code in my “main.py” that is used to connect to the MQTT broker per your instructions above:
led.value(0)
def connect_and_subscribe():
global client_id, mqtt_server, topic_sub
client = MQTTClient(client_id, mqtt_server, user=xxxxxx, password=xxxxxx)
client.set_callback(sub_cb)
client.connect()
client.subscribe(topic_sub)
print(‘Connected to %s MQTT broker, subscribed to %s topic’ % (mqtt_server, topic_sub))
return client
The last seven lines are indented in my program but I could not get them to indent here.
I hope this helps in resolving my problem.
Again, thank you in advance for your help.
Gayland
Hi again.
In your Node-RED dashboard, check if you have the following configurations.
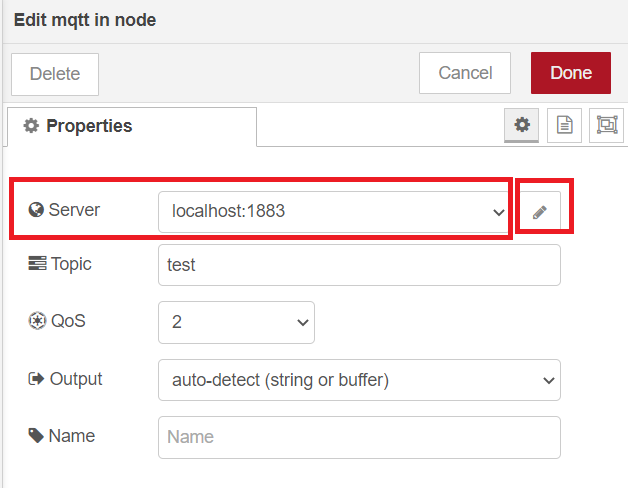
Double-click your MQTT in Node and click on the edit icon:
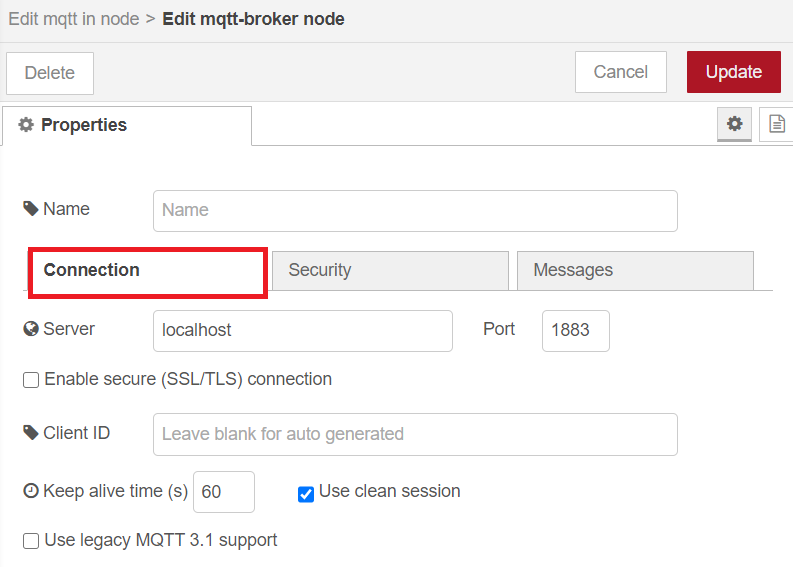
In the Connection tab, check that you have the following:

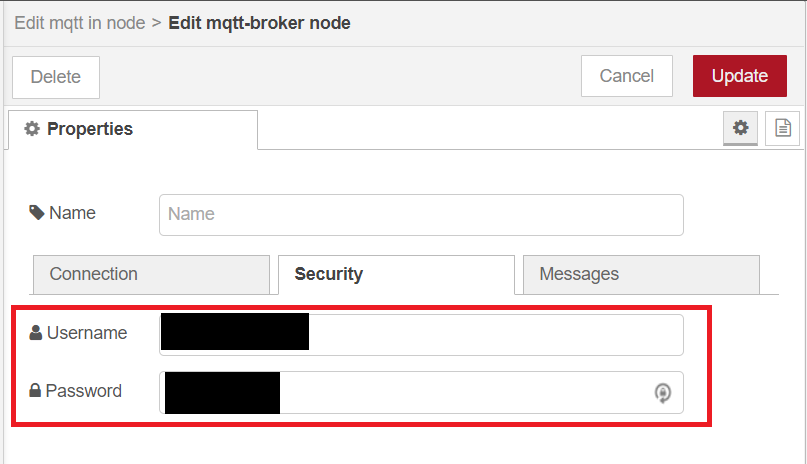
Then, in the Security tab, insert your MQTT broker username and password:

After making any changes, don’t forget to click the Deploy button.
Let me know if this helps.
Regards,
Sara
Sara,
I did as you recommended by adding my MQTT broker username and password in the “Edit mqtt-broker node” and nodes seems to connect but I still can’t get any temperatures to show up on my Dashboard. The slide button appears to work when I brought it up on one computer and then indicates to work on another computer. At this point I’m not able to actually see it work on the ESP32 because I’m a distance away from it.
On the Node-red workspace, I’ve connected the “mqtt in node” to a dashboard “chart node” for all four of my temperatures and they show to be connected (green connected square). But when I go to the Dashboard, their chart label appears but no chart or data just a blank.
It seems like I’m so close but can’t figure out why it can’t see my temperatures on my Dashboard. Do you know of anything I might have forgot or coded in error? Why won’t the temperatures appear on the dashboard? The coding was the same as I used in the wifi application except for adding the MQTT broker username and password in “main.py“.
Gayland
As an aside, rather than using Digital Ocean you could just use your RPi. If you use a dynamic DNS (I use dynu) and port forwarding on your router you can open the RPi up to connections from the internet. Make sure there is nothing private on the RPi and that you only open up to the one device (Use MAC address in the router config). You can download a script that updates dynu with the WAN IP address of your router if it changes.
Other than that I can’t help. I have no idea how to program in Python. Although I did find this post . If you look at it, it’s slightly different to Sara’s:
client = MQTTClient(client_id, mqtt_server, user=b'your_user', password=b'your_pass')
Note the b’s. The b is used to convert a String to bytes literal. The uMQTT Simple library uses bytes on topics and authentication keys (like user and pass) because that data is sent over network sockets as bytes.
Thanks for the info Steve but I think I’ll stay with Digital Ocean for now.
Gayland
Hi again.
Double-check that you have the same topic on the Node-RED nodes and in your MicroPython code.
It must be the same (capital letters matter), otherwise, it won’t receive the readings.
I don’t know what else can be causing the issue.
Let me know your progress.
Regards,
Sara
Sara,
I’ve checked all my lines of code in the umqttsimple.py, boot.py, and main.py several times and can’t find any errors. Also checked on capital letters in node-red and didn’t find any errors And I didn’t see any errors when I loaded. But my esp still doesn’t seem to be communicating with MQTT. I can change the switch on the Node-red dashboard on one computer and see the change on another computer but the light on my esp stays out. I can also see these changes without the esp even powered up. And also no temperatures when esp is powered and running. Somehow MQTT is working but not communicating with the esp.
Do you have any thoughts as to what else I can check to see why they aren’t communicating with each other? Would there be any anything in the VM (Digital Ocean) that I might have forgotten? Any connection between VM and esp that needs to be reviewed or checked?
Thanks again for all your help.
Gayland
Hi again.
I don’t think it is related with digital ocean. Otherwise, you wouldn’t be able to access Node-RED and you wouldn’t see the nodes connected to the broker.
Can you share your complete code with me? (hide your passwords)
As well as a printscreen of one of your receiver MQTT nodes? Otherwise, at this point, it is very difficult to figure out what might be wrong.
To share your code, you can use github or a link to pastebin, for example.
Regards,
Sara
Hi again.
I received your email with the code and printscreens.
I don’t know what might be wrong.
Can you test the code in this project? https://randomnerdtutorials.com/micropython-mqtt-publish-ds18b10-esp32-esp8266/
It only uses one DS18B20 sensor. Also, don’t forget to insert you broker credentials and change the MQTT topic.
After uploading, see if it prints something on the shell.
After that, if everything is working, you can add the other sensors.
Regards,
Sara
Sara,
I reviewed the above coding and I believe the “boot.py” was left out of the tutorial. I may be mistaken but I couldn’t find I. How can I get a copy of it?
Thank you.
Gayland
Hi again.
In case of that particular example, we’ve placed all the code inside main.py.
You don’t need boot.py.
Regards,
Sara
Sara,
I’ve loaded all the code into the esp and set up my node-red dashboard but I still don’t get any readings. Chart is blank and gauge is at zero. Loaded esp32 per below:
>>>
Ready to download this file,please wait!
……………………………………………
download ok
exec(open(‘umqttsimple.py’).read(),globals())
>>>
>>>
>>>
Ready to download this file,please wait!
…………….
download ok
e
Looks like a clean load.
A couple of things:
- In your tutorial it is mentioned: “The Server field refers to the MQTT broker. In our case, the MQTT broker is the Raspberry Pi, so it is set to localhost:1883. If you’re using a Cloud MQTT broker, you should change that field.” Should this be change in my case since I’m using Digital Cloud?
- In my uPyCraft IDE, I have an “*” by the “*main.py” at the top of the editor. Does this mean anything?
Other than these few things, I still can’t figure out why there isn’t any temperature on the dashboard. Any help?
Gayland
Hi again.
1)
You should change the field as I’ve explained previously to include your MQTT server, username and password.
client = MQTTClient(client_id, mqtt_server, user=xxxxxx, password=xxxxxx).
2)
I’m not sure, because at the moment, I don’t have acces to my personal computer, but I think the * means that the script is new and it is not saved anywhere. Double-check that the file is saved on the ESP32.
After uploading the code, and pressing the ESP32 reset button, what do you see being printed in the Python Shell?
Regards,
Sara
Hi Sara,
I already did put my username and password in that line and commented the previous line.
I also uploaded the code and pressed the ESP32 reset button with the following result in the Python shell:
>>>
>>>
Ready to download this file,please wait!
……………………………………………
download ok
exec(open(‘umqttsimple.py’).read(),globals())
[0;32mI (25810) modsocket: Initializing[0m
>>>
>>>
>>>
Ready to download this file,please wait!
…………….
download ok
eets Jun v:0x00,hd0x40080400,len:6216
entry 0x400806e8
[0;32mI m
[0;3[0;32mI (4for dy&BZ *K: D/IR[0;32mI (66) cpu_start: Starting scheduler on PRO CPU.[0m
[0;32mI (0) cpu_start: St
MicroPytho1.10-284-ga6e5846ba on 2019-04-17; ESP32 module with ESP32
Type “help()” for more information.
>>>
See any problem areas? The temperature still doesn’t appear in Node-Red.
Has this program and temperature sensor worked successfully through Digital Ocean and onto Node-Red for you?
Gayland
Hi.
Yes, I’ve tested that code myself with Node-RED on digital ocean and it worked fine.
After running the code, you should get a message on the shell saying that the ESP is connected to the broker and it should print the temperature every 5 seconds on the shell.
If the ESP32 is not printing this, it means that it is not running the code properly – I’m not sure if you’re uploading the code properly to the ESP32.
Have you tried your code locally? With the broker and Node-RED installed on RPi? Did it worked?
It is very strange that you cannot get it to work.
Regards,
Sara
Sara,
I tried the recommendation above with my RPi and it worked perfectly, however, it does not work when I try to run it through the Digital Ocean VM. I went through the Digital Ocean VM check with the “Hello’ world!” example and it did appear on the Putty screen. So I went into the “main.py” and changed mqtt_server to the VM IP address and mosquitto access username and password. I also put a “#” in front of the line: “client = MQTTClient(client_id, mqtt_server)” and removed the “#” in front of the next line with my username and password.
Any suggestions as to why I’m not getting any data in my Node-red dashboard? By the way, I did also get temperature data in the shell when communicating with the RPi but not when I changed over to the Digital Ocean VM. It still seems like I’m having a connection problem with the VM.
Any suggestions from here? I feel I’m so close but yet not data.
Gayland
Does Digital Ocean have logging? Can you see where it connects?
Did you add a ‘b’ in front of your username/password?
Steve,
Don’t know if DO has logging or at least I don’t know how to get to it. Don’t see any connection.
Sara’s example above doesn’t have any ‘b’ in front of the username/password. Exactly where would the ‘b’ go? I could try it. Thanks for the info.
Gayland
Read a few posts back:
client = MQTTClient(client_id, mqtt_server, user=b'your_user', password=b'your_pass')
Remember to include the quotes.
Steve,
Thanks for your interest. But I just got through trying your suggestions above and unfortunately they didn’t work.
Both umqttsimple.py and main.py indicate “download ok”.
I still am not seeing any temperature printouts in the shell like I saw when using the RPi as the MQTT server. And therefore nothing on the node-red dashboard.
Thanks again.
Gayland
Hi again.
I don’t know what else I can do to help you.
Try this code: https://gist.github.com/sarasantos/73ae2323d7f3e53157e654a356ea1b7a
Replace with your SSID, passoword, mqtt server, username and password.
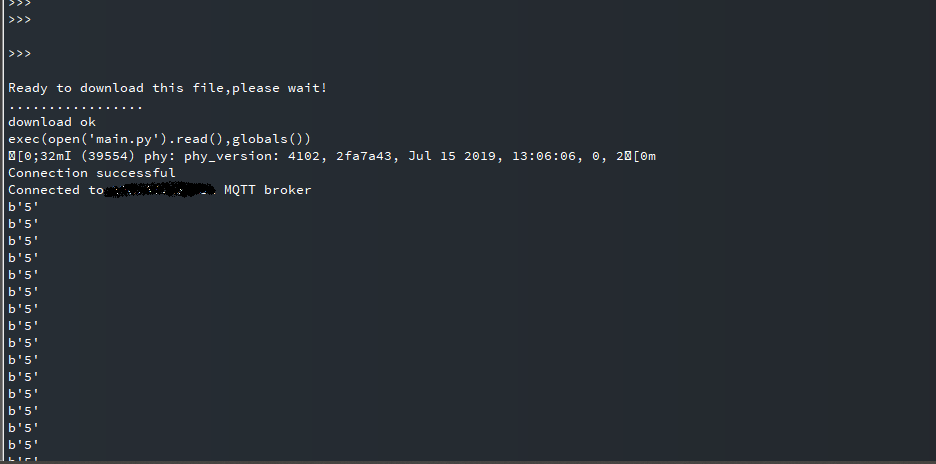
Then, in the shell, you should get something like this:

This is a simple example that publishes a 5 to the esp/ds18b20/temperature topic.
I tried this example and it works. If it won’t work for you, I don’t know what can be the problem :/
Regards,
Sara
I’m out. I don’t know Python nor Digital Ocean so don’t have any more suggestions.
Sara,
Finally, success, everything is working, four DS18B20 temperature sensors and one LED output from anywhere through Digital Ocean.
My biggest last problems include miss configurations. Small errors and sometimes hard to find. I think one of the problems I had was that I didn’t put “b’s” with quotes around my username and password. Original code didn’t use them but Steve above mentioned them above and they seemed to work. I believe Rui mentioned them in another thread. Anyway they worked.
Configuring your last recommendation using one sensor certainly helped me find errors and understood the configurations.
Also, my LED output wasn’t working and the problem was that I configured the node switch payload as “true and false” instead of “on and off”.
Again, Sara, thank you very much for all your patience and help. Your tutorials always work and teach a lot of principles that I was unaware of. Your projects are practical and certainly can be used in real situations.
Thanks again.
Gayland