Ok I got to the port finally, but when I try to upload the sketch I keep getting errors, been able to fix some but not the last one.
Arduino: 1.8.12 (Windows 10), Board: "AI Thinker ESP32-CAM"

C:\Users\TheRa\AppData\Local\Temp\arduino_modified_sketch_585865\CameraWebServer.ino: In function 'void setup()':
CameraWebServer:31:19: error: 'Y2_GPIO_NUM' was not declared in this scope
config.pin_d0 = Y2_GPIO_NUM;
^
CameraWebServer:32:19: error: 'Y3_GPIO_NUM' was not declared in this scope
config.pin_d1 = Y3_GPIO_NUM;
^
CameraWebServer:33:19: error: 'Y4_GPIO_NUM' was not declared in this scope
config.pin_d2 = Y4_GPIO_NUM;
^
CameraWebServer:34:19: error: 'Y5_GPIO_NUM' was not declared in this scope
config.pin_d3 = Y5_GPIO_NUM;
^
CameraWebServer:35:19: error: 'Y6_GPIO_NUM' was not declared in this scope
config.pin_d4 = Y6_GPIO_NUM;
^
CameraWebServer:36:19: error: 'Y7_GPIO_NUM' was not declared in this scope
config.pin_d5 = Y7_GPIO_NUM;
^
CameraWebServer:37:19: error: 'Y8_GPIO_NUM' was not declared in this scope
config.pin_d6 = Y8_GPIO_NUM;
^
CameraWebServer:38:19: error: 'Y9_GPIO_NUM' was not declared in this scope
config.pin_d7 = Y9_GPIO_NUM;
^
CameraWebServer:39:21: error: 'XCLK_GPIO_NUM' was not declared in this scope
config.pin_xclk = XCLK_GPIO_NUM;
^
CameraWebServer:40:21: error: 'PCLK_GPIO_NUM' was not declared in this scope
config.pin_pclk = PCLK_GPIO_NUM;
^
CameraWebServer:41:22: error: 'VSYNC_GPIO_NUM' was not declared in this scope
config.pin_vsync = VSYNC_GPIO_NUM;
^
CameraWebServer:42:21: error: 'HREF_GPIO_NUM' was not declared in this scope
config.pin_href = HREF_GPIO_NUM;
^
CameraWebServer:43:25: error: 'SIOD_GPIO_NUM' was not declared in this scope
config.pin_sscb_sda = SIOD_GPIO_NUM;
^
CameraWebServer:44:25: error: 'SIOC_GPIO_NUM' was not declared in this scope
config.pin_sscb_scl = SIOC_GPIO_NUM;
^
CameraWebServer:45:21: error: 'PWDN_GPIO_NUM' was not declared in this scope
config.pin_pwdn = PWDN_GPIO_NUM;
^
CameraWebServer:46:22: error: 'RESET_GPIO_NUM' was not declared in this scope
config.pin_reset = RESET_GPIO_NUM;
^
Multiple libraries were found for "WiFi.h"
Used: C:\Users\TheRa\AppData\Local\Arduino15\packages\esp32\hardware\esp32\1.0.4\libraries\WiFi
Not used: C:\Program Files (x86)\Arduino\libraries\WiFi
exit status 1
'Y2_GPIO_NUM' was not declared in this scope
This report would have more information with
"Show verbose output during compilation"
option enabled in File -> Preferences.
Hi Mike.
You probably don’t have the necessary files to run the code.
Does your Arduino IDE have several tabs as shown in the following image?

If the tabs are missing, that’s probably the cause of the error. Those variables Y2_GPIO_NUM, Y3_GPIO_NUM, and so on, are declared on the camera_pins.h tab. If you don’t have those tabs, the code can’t find them, and you’ll get errors.
You need to make sure that inside the folder that contains the CameraWebServer.ino file, you also have the other files: app_httpd.cpp, cmaera_index.h, and camera_pins.h
I hope this helps.
Regards,
Sara
Ok Sara, Thanks for the answer. I work nights and just now saw the answer so when I get home I’ll pull it up and look.
Hi Mike.
Where did you get your code from?
In your Arduino IDE, did you went to File > Examples > ESP32 > Camera > CameraWebServer?
I’m just trying to figure out where the error comes from.
Regards,
Sara
Hi Sara,
Yes to where I got the code from. I am definitely not smart enough to be able to code a project yet. I usually try to type in code as you and Rui have it written just to get used to the code. But unless I get real lucky I sometimes just copy and paste. I really appreciate your help and understanding. The code was the one that came with the example.
Mike
Hi again.
You seem to have everything right. I have no idea why you are getting that error.
Can you go to this link, download the .zip file. Unzip the file, and then run the code on that folder?
https://github.com/RuiSantosdotme/ESP32-CAM-eBook/blob/master/Code/Module_1/CameraWebServer/CameraWebServer.zip
Then, tell me if it works or if you get the same error.
Regards,
Sara
Well Sara,
I got a little closer to the prize but now it just times out. I tried pushing the reset button at several different spots in the cycle. I get this error.
Arduino: 1.8.12 (Windows 10), Board: “AI Thinker ESP32-CAM”
Sketch uses 2100679 bytes (66%) of program storage space. Maximum is 3145728 bytes.
Global variables use 53552 bytes (16%) of dynamic memory, leaving 274128 bytes for local variables. Maximum is 327680 bytes.
esptool.py v2.6
Serial port COM4
Connecting…….._____….._____….._____….._____….._____….._____….._____
A fatal error occurred: Failed to connect to ESP32: Timed out waiting for packet header
A fatal error occurred: Failed to connect to ESP32: Timed out waiting for packet header
This report would have more information with
“Show verbose output during compilation”
option enabled in File -> Preferences. ‘biq
Hi Mike.
That error means that the ESP32-CAM is not in flashing mode or it is not connected properly to the FTDI programmer.
Double-check the steps to upload code.
Double-check that you’ve followed the exact steps to put your ESP32-CAM in flashing mode. Failing to complete one of the steps may result in that error.
Note that GPIO 0 needs to be connected to GND so that you’re able to upload code. Additionally, you should connect 5V to the ESP32-CAM 5V pin (not VCC pin).
When you start to see those dots on the debugging window, press the ESP32-CAM on-board RST button and the code should be uploaded.
I hope this helps.
Regards,
Sara
Hi Sara,
After much frustration I did get the sketch to upload onto the card but when I open the serial monitor and remove the ground wire and the GPIO 0 wire then hit the reset everything looks good except I get the following error;
rst:0x1 (POWERON_RESET),boot:0x13 (SPI_FAST_FLASH_BOOT)
configsip: 0, SPIWP:0xee
clk_drv:0x00,q_drv:0x00,d_drv:0x00,cs0_drv:0x00,hd_drv:0x00,wp_drv:0x00
mode:DIO, clock div:1
load:0x3fff0018,len:4
load:0x3fff001c,len:1216
ho 0 tail 12 room 4
load:0x40078000,len:9720
ho 0 tail 12 room 4
load:0x40080400,len:6352
entry 0x400806b8
[E][camera.c:1049] camera_probe(): Detected camera not supported.
[E][camera.c:1249] esp_camera_init(): Camera probe failed with error 0x20004
This is the AI-Thinker with the supplied camera
Hi Mike.
Make sure you are powering the ESP32-CAM with 5V on the 5V pin.
Sometimes it gets that error at first. Try pressing the RST button several times (2 to 3 times) until it recognizes the camera.
If after many attempts, it still doesn’t find the camera, there must be another error. Did you select the right board on the code?
Regards,
Sara
Hi Sara,
I did select the correct board and I am choose the correct board and I am powering through the usb port on my laptop, which I checked with a multimeter, and it is outputting 5v. I will try hitting (pressing) the reset several more times before I light the bonfire.
Thanks again,
Mike
Hi Mike.
I mean, in your code, do you have the AI-Thinker board uncommented, as shown in the following figure?
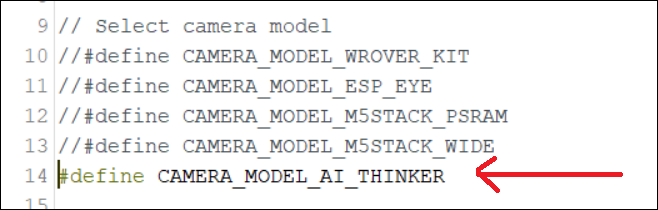
Because that’s the error you get if you don’t select the right camera in the code.
Regards,
Sara
Hi Sara,
The Camera_model_ai_thinker is definitely uncommented as you point out. I have not yet had the opportunity to try the reset multiple times as things behind bars have been hectic with all the uproar about coronavirus. Thanks for all of your time and I will let you know how it goes later.
Thanks again,
Mike
Hi Sara,
I have tried three different boards now and have put external antenna on two of them but board will not give up the ip address. They all just show the dots going across the bottom of the serial monitor. Completely at a loss. Thanks for your help Sara.
Mike
Hi Mike.
Usually, when you only see those dots, it means that or you don’t have written the right network credentials or it can’t catch wi-fi signal.
Double-check your network credentials.
Try staying close to your router. Add the antenna and take a look at the board to see if it is set to use the on-board or external antenna and make the necessary changes if needed.
Regards,
Sara
Hi Sara
I finally got the camera to load up after reentering the wifi credentials several times. Thanks for all your help. Just one more question: can you point me to the tutorial that shows suggested settings for streaming with this board and camera? Thanks again.
Mike
Hi.
So, the problem was the network credentials?
This tutorial shows how to change the settings: https://randomnerdtutorials.com/esp32-cam-ov2640-camera-settings/
Regards,
Sara
Hi Sara,
Thanks for the link. I was able to find the IP address on three of the esp32 cams that I have while still plugged into my laptop for power and data link but when I unplug from the computer and connect the board to a 5v power source I cannot connect to any of the IP addresses. Not sure if I am connecting to the wrong power and ground pins. I am using a variable volt power source and know it is putting out 5v. I am trying to put the camera into the dummy camera housing like Rui did in one of the tutorials. Maybe after this I can quit bugging you so much. Thanks again for your help and patience.
Mike
Hi Mike.
The ESP-CAM has several power pins.
You should connect 5V on the 5V pin (NOT the pin labeled as VCC)
You can connect GND to any of the GND pins.
After uploading the code, disconnect GPIO 0 from GND.
The only connections you’ll have are:
GND -> GND
5V -> 5V
I hope this helps.
Regards,
Sara
Hi Sara,
I had thought that it would not matter as to the ground. I will try it again when I get home. Maybe I was just impatient with the connection to my wifi. Thanks again for all of your help.
Mike