I made a mistake in posting this first time so I am trying again. Sorry.
Rui, After a couple of months medical recovery, I am finally able to continue work on my remote project for the sonoff switches.
I updated the remote to not only send (publish) but also to receive (subscribe) a reply from the switch that it actually operated. The images of that unit are here and I apologize for the poor photos of the leds while they are turned on.
The code for the modified switch
https://pastebin.com/8jpJaVUg
I hope the images and code worked as I don’t use this system very often.
I have another question regarding the sonoff switch. As they come out of the box and connected to the company cloud, the push button can be used to make the switch turn on and off manually.
I would like to add that feature to my existing code so that I can mount the switch inside a utility box and put a pushbutton on a wall plate to control the switch as well as with the wifi connection.
I have built a motion sensor based on your motion/LDR/temp unit but I am only using a radar detector instead of the PIR device. The radar device seems to have far fewer false triggers.
But my question is this? How can I add the pushbutton into the code of the sonoff to make it work like original pushbutton. Any and all ideas deeply appreciate.
Thank you,
Charles Merkel
Hello Charles, no problem. I’ve removed the other posts and I’ll answer you question here.
I’m sorry to hear that, but I hope you are feeling better now!
I also want to apologize for taking so long to get back to you, but we’ve been doing the final steps to have our new office ready. It’s taking way longer than we expected.
Yes, that’s perfect. I can see your images and code. Thanks for using it.
Just to clarify, are you referring to the tall pushbutton connected to GPIO 0? 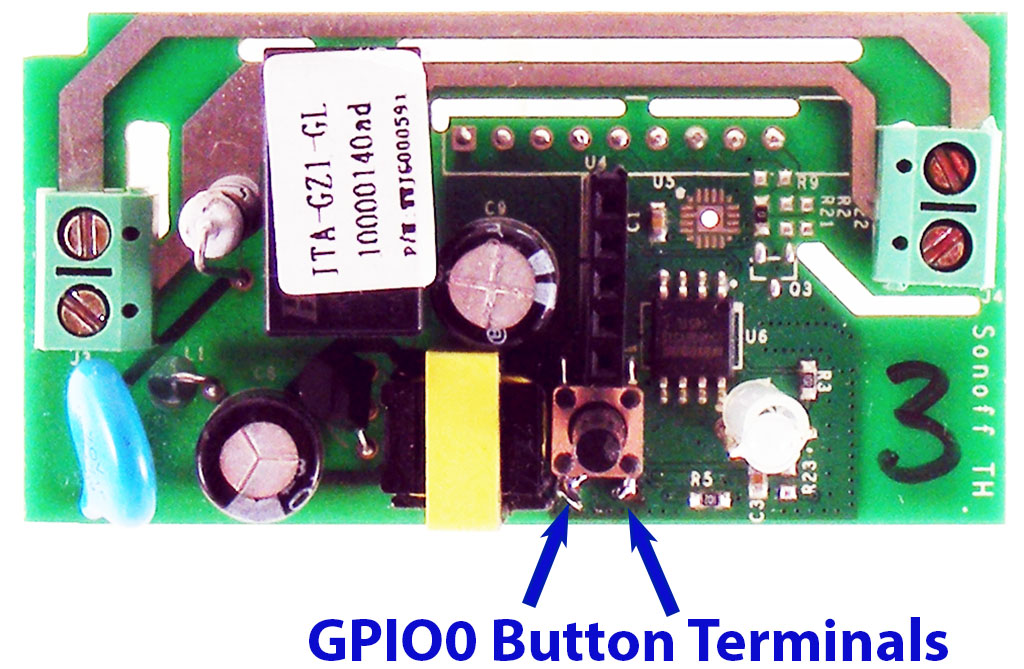
Rui, Thank you for the response. I hope you get the new office setup exactly like you want it.
Yes I was referring to the tall switch on GPIO 0. I actually was planning to remove that switch entirely and attaching two small wires to bring the contacts out to another pushbutton that would be mounted in a switch plate. But I seem to remember that GPIO O might have some special assignment that would prevent me from using it. I simply want the push button to toggle the relay state no matter which state it had been commanded from the wifi input.
Thank you
Charles
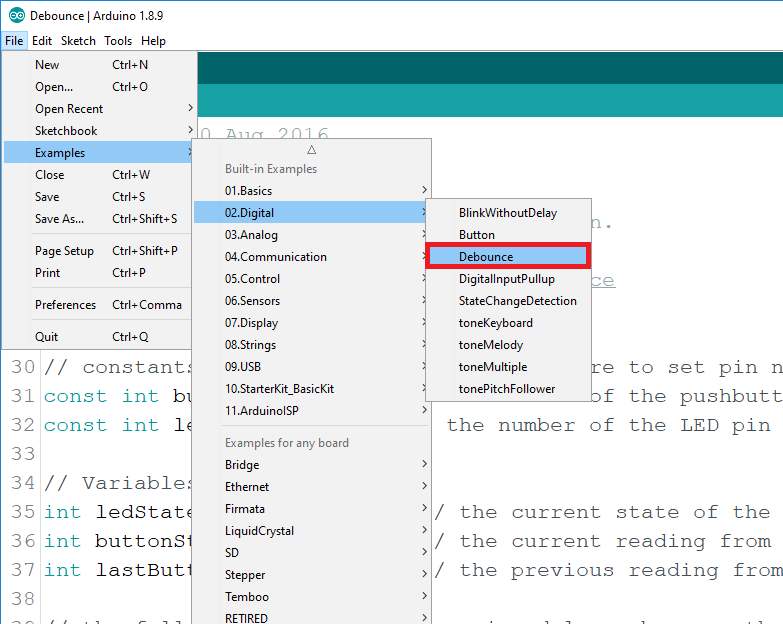
Hello again! I think this is the best and easiest way. Start by opening the example Debounce: File > Examples > Digital > Debounce:
You need to change the variables buttonPin and ledPin to those pins:
const int buttonPin = 0; // the number of the pushbutton pin
const int ledPin = 12; // the GPIO pin of your SONOFF relay
Basically, if you would just upload that sketch to your SONOFF, you’ll be able to toggle the relay ON/OFF when you press the SONOFF pushbutton.
Then, you just need to merge that Debounce code into your current SONOFF code.
Important: always be careful when dealing with AC voltages. You should never program your SONOFF while AC is powering the SONOFF.
Rui, After countless hours of trying to get this switch code added to the sonoff basic, I am still unable to get it to work. I really need some guidance on the correct route to take with this effort. The code attached is my latest feeble effort but all I have accomplished here is to get the button switch to turn the LED on/off. I can also turn the LED off and on from the Dashboard but the only debug message I get is the “on” message from the state message. No matter if I click on the on button or the off button I always get the “on” state message. I also tried flashing the device with the tasmota firmware but I got completely confused by their different approach to the MQTT message structure. I would much prefer to use this firmware as I do understand it somewhat. The use of the simple server on the RPi is easy and it works great. I would definitely prefer not to use any kind of Home Assistant software if I can help it.
The current code is here https://pastebin.com/Ptd6xYd9
Thank you
Charles