I’m getting this error:
“Connecting…….._____….._____….._____….._____….._____….._____….._____….._____….._____….._____
A fatal error occurred: Failed to connect to ESP32: Timed out waiting for packet header
A fatal error occurred: Failed to connect to ESP32: Timed out waiting for packet header
”
Is this a common problem? didn’t found any solution when doing a search.
I have a couple of questions to understand your exact problem.
- Which ESP32 dev board are you using?
- When you plug the ESP32 to your computer, do you see a new COM port appearing?
- Do you have the ESP32 COM Port selected in your Arduino IDE?
If you have the right board name and COM por selected, can you try the next procedure to upload new sketches with Arduino IDE:
- Hold-down the “BOOT” button
- Press the “ENABLE” button once
- Release the finger from the “BOOT” button
- Press the “Upload” button in your Arduino IDE to upload a new sketch
Pressing the on-board buttons in that order forces the ESP32 to start in uploading/flashing mode.
Thanks!
1: It is written “ESP32 DEVKIT V1” on the underside, so I hope it’s the DOIT board
2: Yes, I get a new comport when plugging in the ESP32
3: Yes, I have selected the new port in the IDE
Pressing the BOOT and EN buttons has no effect.
Pressing the EN button gives some output in the serial monitor window (not all rows includedbelow):
“ets Jun 8 2016 00:22:57
rst:0x1 (POWERON_RESET),boot:0x13 (SPI_FAST_FLASH_BOOT)
configsip: 0, SPIWP:0x00
clk_drv:0x00,q_drv:0x00,d_drv:0x00,cs0_drv:0x00,hd_drv:0x00,wp_drv:0x00
mode:DIO, clock div:2
load:0x3fff0008,len:8
load:0x3fff0010,len:3480
load:0x40078000,len:7804
ho 0 tail 12 room 4
load:0x40080000,len:252
entry 0x40080034
[0;32mI (45) boot: ESP-IDF v2.0-3-gbef9896 2nd stage bootloader[0m
[0;32mI (45) boot: compile time 05:59:45[0m
[0;32mI (46) boot: Enabling RNG early entropy source…[0m
[0;32mI (64) boot: SPI Speed : 40MHz[0m
[0;32mI (77) boot: SPI Mode : DIO[0m
[0;32mI (89) boot: SPI Flash Size : 4MB[0m
[0;32mI (102) boot: Partition Table:[0m
[0;32mI (113) boot: ## Label Usage Type ST Offset Length[0m
[0;32mI (136) boot: 0 phy_init RF data 01 01 0000f000 00001000[0m
[0;32mI (159) boot: 1 otadata OTA data 01 00 00010000 00002000[0m
[0;32mI (182) boot: 2 nvs WiFi data 01 02 00012000 0000e000[0m
[0;32mI (205) boot: 3 at_customize unknown 40 00 00020000 000e0000[0m
[0;32mI (229) boot: 4 ota_0 OTA app 00 10 00100000 00180000[0m
[0;32mI (252) boot: 5 ota_1 OTA app 00 11 00280000 00180000[0m
[0;32mI (275) boot: End of partition table[0m
”
Thanks for your help.
Ok, it seems that you’re doing everything right (you have the right board name and COM port selected).
Can you do this exact same procedure again, but with the Arduino IDE serial monitor open?
Having the right board name and COM por selected, do the following:
- Open the Arduino IDE Serial Monitor
- Hold-down the “BOOT” button
- Press the “ENABLE” button once
- Release the finger from the “BOOT” button
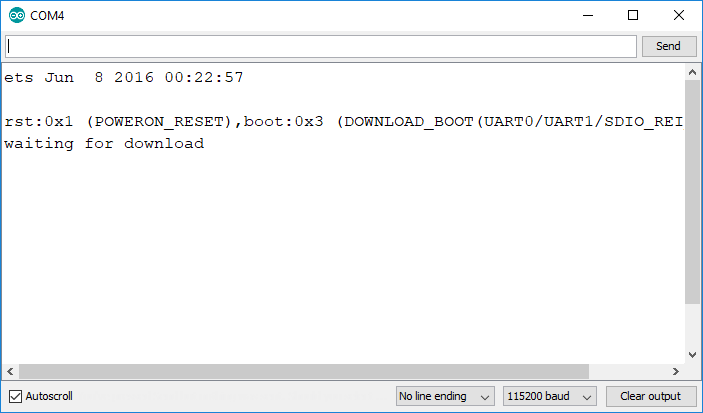
Do you see the following message in your Arduino IDE Serial Monitor?
“rst:0x1 (POWERON_RESET),boot:0x3 (DOWNLOAD_BOOT(UART0/UART1/SDIO_REI_REO_V2))
waiting for download”
- After seeing that message, press the “Upload” button in your Arduino IDE to upload a new sketch
I think I have solved the problem: If I press and release the BOOT button when the text “Connecting:” is shown then it works to download the program into the ESP32 (in this case the Wifiscan).
Thanks for your help and great e-book
I hope it’s working now.
To be honest I’m not sure why that happens, because I don’t have any board with that behavior… But I think it’s either something wrong your specific ESP board or the Arduino IDE fails to send the right command sequence to put the ESP32 board in flashing/uploading mode.
In those boards/with that setup, after uploading a new sketch, press the “Enable” button to restart the ESP32 and run the new sketch uploaded.
Thanks for your kind words and I hope you can proceed with the course!
Regards,
Rui